A nut processing line is not commissioned by switching it on. It is commissioned by proving, one stage at a time, that each machine does what it was bought to do on the material you actually grow: that the husker opens green husk without bruising kernel, that the thresher separates cone from seed, that the sheller cracks and does not shatter, that the sorter sends oversize back where it belongs.
This page is the sequence we walk through with a plant that has just taken delivery: what to verify before the power goes on, how to read the first run, how to calibrate each working setting against your own crop, and what to write down so the acceptance decision is evidence rather than opinion.
Last updated: 29 September 2026
The short answer
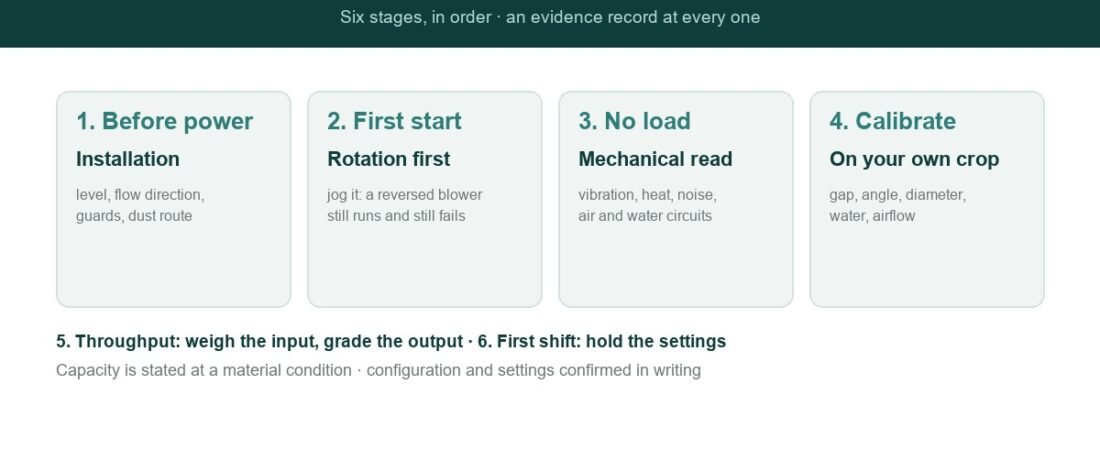
- Commission in stages, not in one afternoon. Pre-power checks, first power-up, no-load run, calibration, throughput test, first production shift.
- Verify rotation direction before you load material. A reversed blower stage blows husk into the nut stream instead of out of it, and it looks like a machine defect.
- Calibrate on your own crop, not on a sample bag. Gap, opening angle, opening diameter and water or airflow settings are only meaningful against a named material condition.
- Prove throughput by weighing. A timed, weighed sample is the only acceptance evidence that survives the first week of production.
- Record settings at the moment they work, together with the material condition, or the line cannot be re-set after a change of variety.
- Configuration, power supply and settings are confirmed in writing for the machines we supply; commissioning follows that document, not a general assumption.
The six stages, and what each one proves
Each stage answers a question the next stage depends on. Skipping one does not save a day – it moves the discovery to the middle of production.
| Stage | The question it answers | Evidence you keep |
|---|---|---|
| 1. Before power | Is the line installed where it can run and be maintained? | Signed pre-power checklist, guard count against packing list, panel photograph |
| 2. First power-up | Does every drive turn the way the machine was designed to turn? | Rotation direction noted per machine, control and e-stop test recorded |
| 3. No-load run | Is anything wrong mechanically, before material hides it? | Vibration, temperature, noise and air or water readings per machine |
| 4. Calibration | Does each working setting suit our crop, not a sample bag? | Every gap, angle, diameter, water or airflow setting with the material condition beside it |
| 5. Throughput test | Does the line deliver the capacity and the recovery we bought? | Weighed input and graded output for a timed run at production feed rate |
| 6. First production shift | Does the line hold its settings across a real shift? | Shift log with settings used, results, and any adjustment made and why |
The evidence column is the part that matters after the commissioning team has gone home. A line that was commissioned without a record is a line that will be re-commissioned every season, by trial and error.
Stage 1: before the power is connected
Most commissioning failures are decided before the electrician arrives. Walk the line with a clipboard and finish these first:
1. Site and level. Each machine sits level on a floor that can carry it with a full hopper, with access on the side the working parts are serviced from. A machine boxed into a corner will never be maintained.
2. Flow direction. Material should travel from machine to machine without being lifted by hand, and without a height drop that damages kernel. Walk the line with a bucket of nuts before anything is bolted down.
3. Guards and covers present and fitted. Count them against the packing list. Guards that arrive in a crate tend to stay in the crate.
4. Dust and husk handling. Decide now where husk, shell, pulp and fines go. A line with no waste route is a line that stops every hour.
5. Cable, panel and earthing to the documentation, with the supply measured at the machine, under load, not at the incoming panel.
6. Water and air (where the process uses them) at the pressure and quality the documentation states, with a shut-off you can reach from the working position.
7. Emergency stops and isolation tested and reachable from where the operator actually stands, not from where the panel happens to be.
Stage 2: first power-up and rotation direction
Power up one machine at a time, and keep material out of the line until every drive has been checked.
- Jog, do not run. A brief start tells you direction and gives you a chance to stop on a noise before it becomes damage.
- Confirm rotation on every driven part, not just the main motor. On machines with a blower stage – our pine nut threshers combine a toothed crusher with blower separation – the air direction decides whether husk leaves the nut stream. Reversed, the machine still runs cleanly and still produces a bad result.
- Check control functions in order: start, stop, emergency stop, any interlock, then the settings that move under power.
- Listen at each machine with the others stopped. A line running all at once hides the bearing that is trying to tell you something.
Stage 3: the no-load run
Run the line empty for long enough to warm the drives, then look for four things:
| Check | What you are looking for | What it means if you find it |
|---|---|---|
| Vibration | Any machine that moves more than its neighbours | Loose fixing, unbalanced or misaligned drive, or a floor that is not level |
| Temperature | Bearings and gearboxes warming unevenly along the line | Lubrication, alignment or a belt that is too tight |
| Noise | New rubs, ticks or whine at a specific speed | A guard touching a moving part, or a worn bearing |
| Air and water circuits | Leaks, weak flow, direction of air at the outlet | A reversed connection or a blocked path – both cheap now, expensive mid-season |
Fix everything you find here. Every one of these faults is quick to correct with an empty machine and slow to correct with a full hopper.
The faults below are the ones that come up at commissioning, and they are worth recognising before they are mistaken for a design problem.
| What you see | What it usually is | What to do |
|---|---|---|
| Husk or skin arriving with the nut | Reversed rotation on a blower stage, or a leaked duct | Confirm rotation first, then walk the air path |
| Machine runs, but output is below the stated capacity | Feed condition outside what the capacity is stated for, or a setting not yet calibrated | Re-test on graded material at the stated condition |
| Motor trips under load | Voltage sag at the machine, undersized cable for the run, or a generator sized on running rather than starting current | Re-measure at the machine while running |
| Vibration that grows through the run | Loose fixing, or a floor that is not level and settles under load | Re-check levelling and torque after the first hot run |
| Breakage higher than expected in the sample | Gap or angle set for a different nut size or moisture | Calibrate again on a squeezed sample of this batch |
| Material bridging at a transfer point | A height drop or a chute angle that suits a different material | Rework the transfer, not the machine |
Stage 4: calibration on your own crop
This is the stage that determines whether the line earns its money, and it is the stage most often skipped because the first batch looks acceptable.
Calibrate one machine at a time, feeding by hand at first:
- Husk peeling. Set the peeling elements for your husk condition and check the nut, not the husk: the target is green husk off and kernel unmarked.
- Threshing. Set the crusher against cone size and set the air so seed leaves one way and cone the other, with recirculation at the level your documentation states.
- Shelling and cracking. Set the gap from a squeezed sample of your nuts, then confirm on a timed run. Measure breakage, not the sound of the machine.
- Opening machines. Opening angle and opening diameter are adjustable on our industrial opening machine, and both need to be set against the nut size you are running; on the compact machine the arc-shaped saw grouting is the working element and the setting follows it.
- Pulping and peeling of wet fruit (coffee, where the line includes it): set the pulping gap first, then water, and read both the bean stream and the pulp stream.
- Sorting and grading. Confirm that each size channel sends oversize back and undersize forward, and that a nut cannot reach the packing point without passing a check.
Write every setting down at the moment it works, with the material condition beside it: variety, size, moisture, source. A number without that context is not a setting, it is a coincidence.
Stage 5: throughput and recovery test
The acceptance test is arithmetic, not impression.
1. Weigh the input. A known weight of material at a known condition.
2. Run the line at production feed rate for a fixed period, not at a showroom rate.
3. Weigh and grade the outputs: whole kernel, broken kernel, unshelled or uncracked, husk or shell, and fines.
4. Compare with the capacity stated for the machine, remembering that a capacity is always stated at a material condition – feeding outside it changes the result, and it changes the answer to whether the line was installed correctly.
5. Repeat the test at the end of the first production week. The second number is the one that tells you the line is stable.
Stage 6: the first production shift and handover
- Run a full shift with the supplier’s commissioning contact reachable and the operator who will actually run the line at the controls.
- Record the settings that were used and the results that came out, in the maintenance and production log, from day one.
- Agree who checks what, and at what interval, before the commissioning visit ends.
- Confirm the spare parts list against the wear parts, and order the first set while the line is still new.
- Photograph every setting as it was left. A photograph survives an operator change better than a memory does.
Frequently asked questions
How long does commissioning a nut processing line take?
It depends on the number of machines and on whether the crop is ready to calibrate against. Pre-power checks and the no-load run can be finished in a day for a small line; calibration and the throughput test need your own material at its real condition, so the useful question is when your crop allows a proper test rather than how many hours the visit takes. We plan commissioning around the material being available.
Can I commission a machine without the crop I will actually process?
You can verify rotation, guarding, no-load behaviour and control functions, and those checks should be done as soon as the machine is in place. You cannot calibrate. Feeding a well behaving sample from somewhere else gives a setting that will be wrong for your material, and the first week of production will then be spent re-discovering what a proper test would have established in an hour.
What should I measure to accept a shelling or cracking machine?
Measure breakage on a weighed sample at production feed rate, and compare it with what you were achieving before, or with the figure confirmed in writing for the configuration you bought. Also record unshelled or uncracked nuts leaving the machine and the fines going to waste. A machine accepted on the look of the discharge rather than on weighed numbers is usually re-negotiated later, without evidence.
What causes a new machine to run in the wrong direction?
Phase order, on three-phase supplies, is the usual cause: any change at the panel, a new supply, a generator switchover or a re-terminated plug can reverse two phases. This is why rotation direction is checked after any electrical work, and why machines with a blower stage should be jogged before material is fed. It is a two-minute check that prevents a very expensive misunderstanding.
Do we need to change settings when the season changes?
Yes. Husk condition, cone size, nut size and moisture all move through a season, and every working setting on a nut line is defined against those conditions. The useful habit is not a fixed setting but a recorded setting per material condition: the log tells you what to return to when the crop returns to that condition next year.
What is the minimum order, and how quickly do you reply?
Minimum order is one unit. OEM branding and customisation are available on request, specifications are confirmed in writing before production, and we normally reply within one business day.
Send us your line drawing
Tell us your crop, your capacity per shift and the machines you are planning, and we will mark up the sequence, the settings that need calibrating and the checks that should happen before the power is connected. Reach us through the contact page.
Related reading and machines
- Macadamia processing line layout: harvest to packed kernel
- How to size a pine nut processing line
- Nut processing machine maintenance checklist
- What drives the price of a macadamia processing line
- Pine nut threshing machine, standard model NS-S121
- Macadamia green husk peeler, industrial
- All nut processing machines
- Nut processing knowledge base
- Nut processing machine quotation: what to include in your enquiry