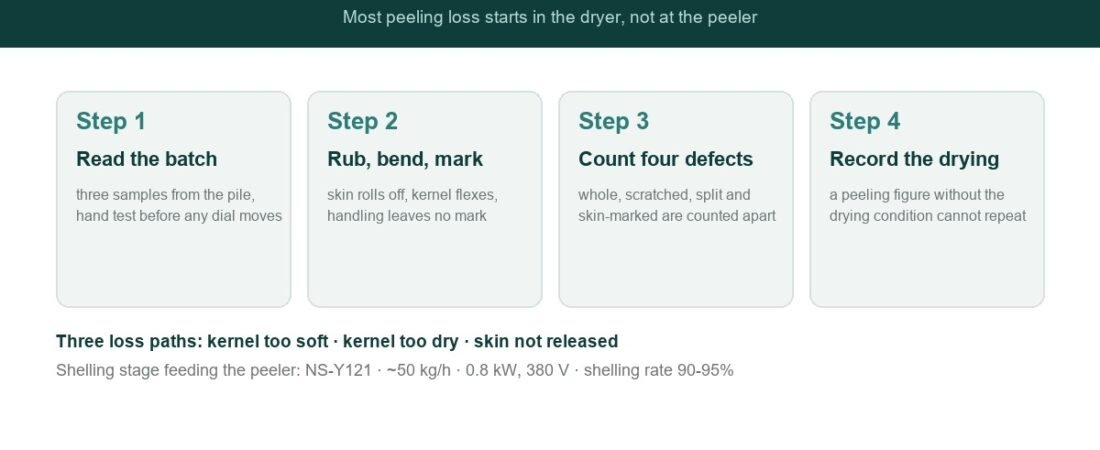
Peeling is the stage where a line loses kernels it has already paid for. By the time a kernel reaches the peeler it has been graded, cooked, rested, shelled and dried, and every one of those stages was judged a success. Then a thin skin that will not come off cleanly turns a whole kernel into a scratched one, and the grade drops without anything obviously going wrong.
This page covers what peeling is actually asked to do, why the outcome is decided upstream of the peeler, the three ways kernels are lost at this stage, and how to measure peeling performance without a laboratory.
Last updated: 28 September 2026
The short answer
- Peeling cannot make kernels whole. It can only avoid breaking them. The whole kernel share reaching the peeler is the ceiling on the whole kernel share leaving it.
- Drying comes before peeling, not after. Testa releases from a kernel that is firm; peel a soft kernel and you tear or scratch it, peel one that is too dry and it shatters.
- Most “peeling loss” is a drying problem wearing a peeling costume. Check kernel firmness before you adjust anything on the peeler.
- Every additional handling step is a loss point. Manual and mechanical peeling do not differ mainly in speed; they differ in which defects they create.
- Testa-free and unmarked is the grade definition, not an aspiration. A kernel with skin fragments is downgraded even if it is physically whole.
- The shelling stage feeding the peeler is published, not promised: the NS-Y121 at around 50 kg/h, 0.8 kW on 380 V, with a shelling rate of 90-95% and unshelled nuts around 3%.
What peeling is actually asked to do
Peeling removes the testa – the thin inner skin that clings to the kernel after shelling. It is a surface operation, and that is the whole point: the peeler is asked to take something off the outside of a fragile object without marking the object underneath.
Two consequences follow, and they explain most of the trouble on a cashew line:
1. The peeler has no leverage. Unlike shelling – where the shell is designed to fail – peeling works on a boundary that only releases cleanly under the right physical condition. When the condition is wrong, the peeler transfers force into the kernel instead of along the skin.
2. The defects it creates are invisible at first. A scratched kernel looks acceptable wet and out of focus under factory light. It is judged at grading, when it is dry and under a buyer’s lamp, and by then the cause is three stages back.
Why the drying step decides the peeling result
The testa is held to the kernel by a combination of moisture and surface structure. As the kernel dries, two things happen at once:
- The kernel firms up, so it resists deformation instead of denting under a scraper or a roller.
- The skin loosens, because skin and kernel shrink at different rates and the bond between them weakens.
Both effects point the same way, which is why drying is the lever that peels kernels without breakage. There is an upper limit as well: past a certain point, the kernel becomes brittle and fractures along its own lines rather than flexing. The working window is therefore a band, not a number – dry enough that the skin releases and the kernel resists marking, not so dry that it shatters.
The practical test is the same at every scale, and it takes a handful of kernels:
1. Take a sample from three places in the batch, not the top of the pile.
2. Rub one kernel between your palms. Skin that rolls off without resisting means the batch is ready.
3. Bend one kernel gently. A kernel that flexes slightly is in the window; one that snaps is past it.
4. Look at the kernel you just handled. If your handling has already marked it, the peeler will not do better.
If a batch fails these tests, the fix is in the dryer, not at the peeler.
The three ways kernels are lost at peeling
Almost every peeling defect has one of three causes. Identify which one you have before changing anything:
| Defect | What it looks like | Usual cause | What to change |
|---|---|---|---|
| Scratched or scored kernel | Lines and marks on the surface, skin partly removed | Kernel too soft at peeling | More drying time before peeling |
| Split or shattered kernel | Kernel broken along a clean line | Kernel too dry and brittle | Shorten drying; check the batch, not the peeler |
| Skin fragments left behind | Speckled kernel, testa patches | Bond not loosened, or peeler not aggressive enough for the batch | Check firmness again; only then adjust contact pressure |
| Broken kernels plus clean skin | Large clean splits, almost no skin left | Force applied to a kernel that had already passed its window | Batch condition, then handling after peeling |
| Damage only in some of the output | Mixed result within one batch | Uneven drying, not a machine fault | Drier loading and batch depth, not peeler settings |
Two of the five rows in that table are the same root cause seen from opposite sides – too soft and too dry. That is why the first diagnostic question at a peeling stage is never “what setting?”, it is “what does the batch feel like?”
Manual and mechanical peeling: different defects, not just different speeds
This is a decision buyers ask about constantly, and the honest comparison is not “slow versus fast”. It is which defects each method creates and which ones your buyer will accept.
| Hand peeling | Mechanical peeling | |
|---|---|---|
| Throughput | Set by the number of hands you can organise | Set by the machine, and by batch condition |
| Typical defect | Scratches and surface marks from repeated handling | Bruising and chipping where contact pressure is high |
| Consistency | Falls through the shift as hands tire | Repeatable while the batch condition holds |
| Batch sensitivity | Tolerant of a mixed batch | Less tolerant: a mixed batch gives a mixed result |
| Quality control | Easy to inspect while working | Needs a sampling routine at the output |
| Changeover | Immediate | Requires a cleaning and reset between batches |
The practical pattern on small and mid-size cashew lines is a hybrid, and it is worth stating plainly: mechanical peeling for the bulk, with a hand-finishing door for kernels that the machine marks. That door is also what lets you keep a mixed batch out of the reject bin.
Measuring peeling performance in ten minutes
You do not need a laboratory to know whether your peeling stage is improving. You need a scale and a fixed sample:
1. Take a 500 g sample from the peeling output at the same point in every shift.
2. Weigh and count whole, scratched, split and skin-marked kernels as four separate categories. Skin-marked is the category most lines forget to count, and it is the one that decides grade.
3. Repeat three times per shift – start, middle, end – so you can see the drift, not just the average.
4. Record the drying figure that produced the sample. A peeling result without the drying condition beside it is a number you cannot repeat.
5. Compare shifts, not days. Peeling problems appear inside a shift long before they appear in daily totals.
If your defect rate rises through the shift while the drying record is unchanged, look at handling and operating rhythm. If it is high from the start of the shift, look at the batch.
A batch record for peeling
Peeling only repeats when the drying condition is written down next to the result. These columns are the minimum, and on most lines they fit on one sheet per shift.
| Column | Why it is there |
|---|---|
| Date, lot and kernel size band | Peeling only repeats for a consistent size and grade |
| Drying method, condition and time | The variable that decides the peeling result |
| Hand test at three points: rub, bend, mark | The control that decides whether to peel or wait |
| Feed rate into the peeler | Separates machine behaviour from batch behaviour |
| Contact pressure or setting used | Records what you actually changed, and when |
| Whole, scratched, split and skin-marked counts from a 500 g sample | Four defects with four causes; one number hides all of them |
| Sample time within the shift | Shows the drift, not only the average |
| Hand-finishing or rework volume | The real cost of a marginal batch |
| Output weight against input weight | Where the material actually went |
The same discipline is set out for the shelling stage in cashew shelling machine: reading the numbers before you buy, and the sampling method is the one used in whole kernel rate: how to measure it and improve it.
Common mistakes
| Mistake | What it costs | The fix |
|---|---|---|
| Peeling straight from the sheller | Skin that resists and kernels that mark | Dry to the working window first, then test |
| Turning contact pressure up first | You tune the machine around a batch problem | Test kernel firmness before touching the peeler |
| Drying one deep batch | Part of the batch soft, part brittle | Dry in even, shallow layers |
| Counting only broken kernels | Scratched and skinned kernels pass into the pack | Count four defect categories, not one |
| No drying figure beside the peeling result | A result you cannot reproduce | Record both on the same line |
Frequently asked questions
Why do my cashew kernels break during peeling?
Nearly always because the kernel reached the peeler outside its working window. A kernel that is still soft deforms under the scraper and then dries in that shape, while one that has gone too far becomes brittle and fractures along its own lines. Both are reported as breakage at the peeler, but both are corrected in the dryer, so test firmness before changing any setting.
How do I know a batch is ready to peel?
Take a sample from three places in the batch, not from the top of the pile. Rub one kernel between your palms: skin that rolls off without resisting means the bond has loosened. Bend one kernel gently: slight flex means you are inside the window, a clean snap means you are past it. If your own handling already marks the kernel, the peeler will do worse.
Is mechanical peeling worse for whole kernel recovery than hand peeling?
Not automatically – the methods create different defects. Hand peeling mainly produces scratches and surface marks from repeated handling, and drifts as hands tire. Mechanical peeling repeats while the batch condition holds, but it is less tolerant of a mixed batch and tends to bruise or chip under high contact pressure. On most mid-size lines the answer is a hybrid: machine for the bulk, with a hand-finishing door for kernels the machine marks.
Should kernels be peeled before or after drying?
At the point in the drying profile where the testa releases and the kernel is firm, which in practice means after drying has done its work rather than straight from the sheller. Drying performs both jobs at once: the kernel stiffens so it resists marking, and the skin loosens because skin and kernel shrink at different rates. Peeling a soft kernel pushes force into the kernel instead of along the skin.
Can I peel a batch that has been resting overnight?
Sometimes, but re-test it rather than assuming. A rested batch keeps losing moisture, so a batch that was inside the window at the end of the shift may be past it the next morning. Run the same three-point test and compare with the reading you recorded when it peeled well. If the batch has moved, the fix is a short conditioning step, not more pressure at the peeler.
What is the minimum order, and how quickly do you reply?
Minimum order is one unit. OEM branding and customisation are available on request, specifications are confirmed in writing before production, and we normally reply within one business day.
Send us your peeling defect sample
Send a photograph of the worst peeling output you are getting, the share of each defect you see, and the drying condition that produced the batch. We will tell you which of the three loss paths you are on and what to change first. Reach us through the contact page.
Related reading and machines
- Cashew shelling machine: reading the numbers before you buy
- Whole kernel rate: how to measure it and improve it
- Cashew processing: the complete guide
- Cashew steam cooking and shelling: temperature and timing
- Cashew shelling machine, NS-Y121, around 50 kg/h
- Cashew shelling machines
- All nut processing machines
- Nut processing knowledge base